When a sudden leak or flood turns your home into a swimming pool, you need to take action right away. Immediate restoration reduces damages and keeps follow-on issues like mold growth and structural decay at bay. The process involves a few phases that work together to get your property back to normal. Here’s how long it typically takes from start to finish:
Emergency Response
Salt Lake City Water Damage can occur at any time and is always a race against the clock. Within 24 hours, mold can start to grow, and structural materials can begin to rot or warp. Reacting quickly mitigates these risks and saves money on costly repairs later.
The first step in responding to water damage is assessing the severity and source of the problem. Professional water damage restoration experts can identify sources of moisture and provide recommendations for remediation. This process may involve removing damaged materials, cleaning affected surfaces, and installing drying systems. Moisture that remains in walls, floors, and insulation can lead to long-term problems.
Once the area is inspected, it must be dried and dehumidified. This can be done using commercial-grade dehumidifiers and fans, along with regular monitoring of moisture levels. Dehumidification is especially important for hard-to-reach areas like behind cabinets and under floorboards.
After the area is dry, it must be disinfected and sanitized. This process removes bacteria, viruses, and other contaminants that may be present in contaminated water. This process is important for protecting human health and ensuring that all areas are thoroughly cleaned before repairs are made.
Water damage emergencies can occur at any time, so it’s a good idea to be prepared by having an emergency response plan. Knowing who to call and what supplies to have on hand can reduce stress during a crisis. Keep a list of essential contacts, including plumbers and electricians, and store it in multiple places, such as on your phone or in a visible spot at home. Keeping a basic toolkit with items like tarps, buckets, and a wet/dry vacuum can also speed up the response time.
Inspection and Assessment
The initial inspection and assessment are critical for safe and effective recovery. Professionals address safety hazards, turn off power if necessary, and check the structural integrity of affected areas. They also identify the water source and assess how much moisture is present. Homeowners can help expedite the process by opening windows and doors to improve ventilation, removing excess water with towels or wet/dry vacuums, and documenting the damage for insurance claims.
Detailed moisture mapping and specialized equipment reveal hidden pockets of water that aren’t visible to the naked eye. This data shapes a tailored restoration approach. For example, clean water from supply lines requires different treatment than contaminated black water from sewer backups.
Stagnant water fosters mold and mildew, which can trigger respiratory problems. It also weakens building materials over time, posing a structural risk.
Immediate professional intervention mitigates these risks and reduces recovery costs. By acting quickly, water damage remains confined to surface materials, rather than penetrating deep into drywall and insulation.
The next steps are to remove all standing water, dry and dehumidify the remaining materials, and disinfect surfaces and contents. This can take three to five days, depending on the extent of the damage and the size of the affected area. Professionals can then begin to repair and restore the property. If the property requires significant reconstruction, it may take weeks or even months. By understanding the recovery timeline, homeowners can have realistic expectations about when their homes will return to normal.
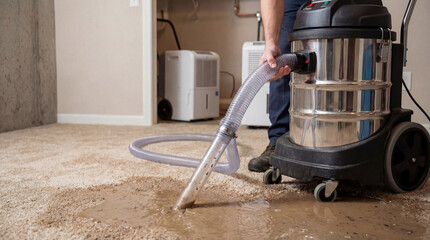
Water Extraction
If your home experiences a water disaster, you need to act fast. The longer water is allowed to soak into the property, the more damage it causes and the more expensive repairs will be. Water damage restoration professionals can help minimize long-term complications.
The first step is an inspection and assessment of the affected areas. Professionals look at the amount of water, categorize it as clean, gray, or black water, and assess structural risks. They also use tools like moisture meters and infrared cameras to spot hidden pockets of water that aren’t immediately apparent.
Once the inspection is complete, water extraction begins. Professionals use industrial-grade pumps and vacuums to remove bulk water from the property as quickly as possible. This may take a few hours for small areas and minor flooding, but large-scale extractions can be more time-consuming. It’s important to move items away from the water, shut off power to appliances, and keep access points clear for restoration technicians.
Extraction is critical because it prevents secondary damage, such as mold growth, warping, and rot. It also accelerates drying and reduces the need for costly renovations. It’s also an important part of preparing insurance claims.
If you decide to tackle water damage cleanup yourself, it’s essential to understand the process and avoid common mistakes. Using household tools on larger-scale jobs can lead to additional damage, prolong the drying process, and increase your cost. It’s also important to know the difference between water mitigation and water extraction. Water mitigation refers to stopping further damage, while water extraction is the removal of visible and invisible water from a property. Water mitigation is vital to avoiding issues like structural weakening, mold, and odors.
Structural Drying
The structural drying process removes moisture from building materials to prevent damage and restore a safe environment. This is one of the most important steps in water damage restoration, as it ensures that all affected materials are dry before moving on to repair and reconstruction work. In addition, a successful structural drying process prevents the creation of hidden moisture pockets in walls and floors that can lead to mold or mildew growth.
Structural drying needs to be done by a professional, using equipment like moisture meters and thermal imaging cameras. These tools help map the full extent of moisture within a structure, shaping a targeted drying plan. Moisture meters measure surface moisture and reveal hidden pockets of wetness behind wall studs, framing, or subtle floor slopes. A qualified team can identify these issues, ensuring that all moisture is removed and that the structure is ready for repairs.
The first step in structural drying is to stop the source of water intrusion, which may involve shutting off the water supply or fixing a broken pipe. After that, standing water must be extracted quickly with pumps and wet vacuums. The faster this is done, the less damage will occur to materials. Air movers and dehumidifiers can then be strategically positioned throughout the space to maximize evaporation rates and maintain optimal relative humidity levels.
The next stage in the restoration process is to conduct a comprehensive assessment of the damage, which involves inspecting and documenting damaged materials for insurance purposes. This helps homeowners determine what can be salvaged and if repairs are necessary, helping them get back to normal more quickly. During this phase, restoration contractors will also create a repair estimate for the insurer to review and approve.
Repairs
Water damage can occur in a matter of minutes and wreak havoc on buildings, property values, and lives. Understanding the timeline for a restoration project can help you make informed decisions during stressful situations. Professional water damage repair teams implement a comprehensive process that includes assessment, water extraction, structural drying, and re-construction. Using moisture detection tools, industrial-grade drying systems, and established protocols minimizes damage and restoration timelines.
The initial water removal and drydown phase typically takes three to five days, depending on the extent of the damage. This phase is essential to prevent mold growth and other secondary damage. During this stage, professionals remove and dispose of unsalvageable materials, promote airflow, use high-powered fans to reduce humidity levels, and monitor for moisture.
Structural repairs and reconstruction return affected areas to their pre-storm condition or better. This includes repairing or replacing damaged materials like drywall, insulation, and flooring, as well as finishing details like painting and deodorization. The duration of this phase depends on material availability, contractor scheduling, and building inspections.
The best way to control the restoration timeline is to take proactive action when disaster strikes. Turning off the water supply, evacuating the area if it’s unsafe, and calling the gas company for leaks are just a few steps that can mitigate damage and accelerate the restoration process. Professional photographs and moisture assessments document the scope of damage for insurance claims, expediting the claim processing process.
Immediate professional intervention prevents most secondary damage and significantly shortens the restoration timeline. Waiting can cause significant additional damage, requiring extensive reconstruction and creating health risks from mold. A quality restoration team balances urgency with due diligence, ensuring that permanent repairs meet industry standards and won’t require costly corrections down the line.